Up and running in under 10 minutes
How it works.
Spoiler: it’s simple.
No technician. No IT department. No specialist hardware. Just your existing TV, the Split‑Flap TV app, and five straightforward steps.
01 Choose hardware
02 Install the app
03 Connect your screen
04 Create your board
05 Schedule & go live
Step 01
Choose your hardware.
You probably already have it.
Split‑Flap TV runs on whatever screen you already have. Any Android TV, Google TV, Google Chromecast, iPhone, iPad, or Apple TV will work perfectly. No specialist hardware, no installation engineer, nothing to buy if you’ve already got a screen.
If you’re testing it first, your phone works fine. When you’re ready to go live, move it to the TV in your venue.
- — Smart TVs (Android TV / Google TV)
- — Any TV + Google Chromecast (HDMI)
- — Android tablets & phones
- — iPhone, iPad & Apple TV
- — Multiple screens chained together


Step 02
Download the app.
Takes 60 seconds.
Search for Split‑Flap TV on the Google Play Store or Apple App Store and install it on your device. That’s it. The app launches to a device ID screen — you’ll use that in the next step.
Step 03
Connect your screen.
One Device ID. Done.
When the app opens on your TV or device, it shows a short Device ID — think of it as a unique address for that screen. Log in to your Split‑Flap TV account at my.splitflaptv.com, go to Devices, and enter that ID. Your screen is now linked to your account and ready to receive content.
Managing multiple locations? Repeat this once per screen. Each one gets its own ID and can show different content independently.
Tip: Keep a note of each Device ID and which screen it belongs to. It makes managing multiple displays much easier.

Step 04
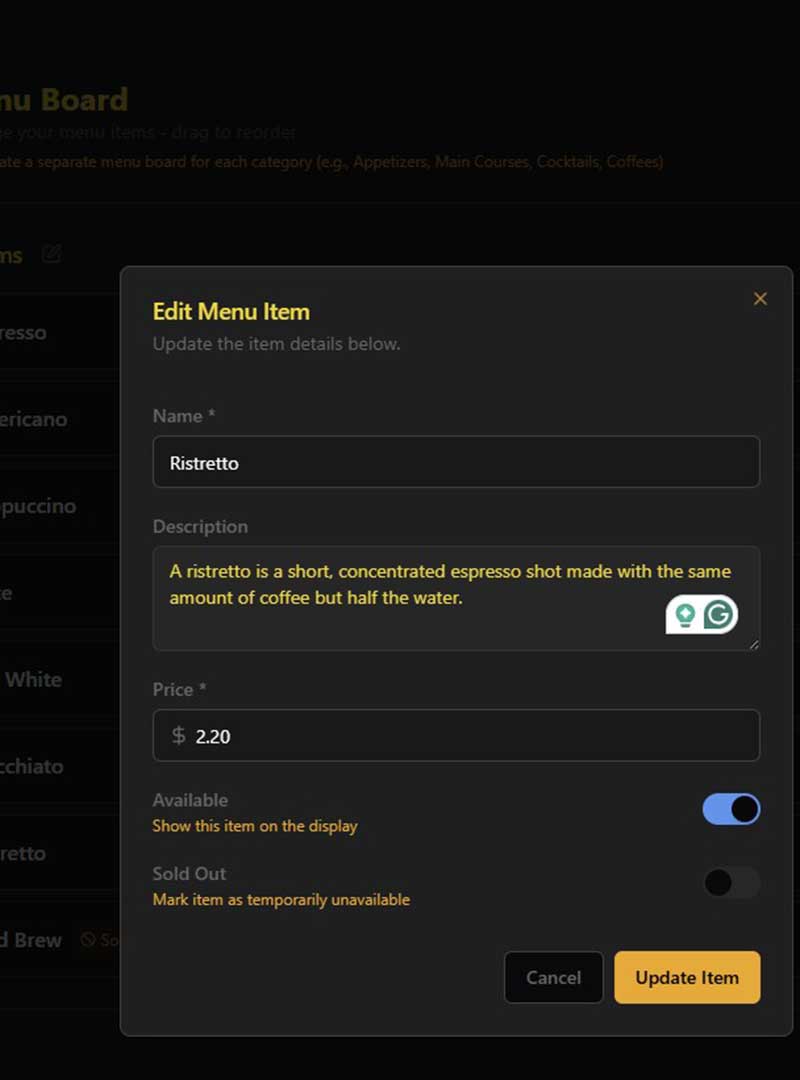
Create your board.
Your message, your layout.
In your dashboard, create a new board. Choose how many rows and columns you want — this controls how much text fits on screen. Type your message, pick your text colour, and hit save. Add as many messages as you like; they cycle automatically in a loop.
You can also add images, a live clock, real-time weather, news feeds, or social media counters depending on your plan.
Text messages
Photos & images
Live clock
Weather
News feeds
Social counters
Step 05
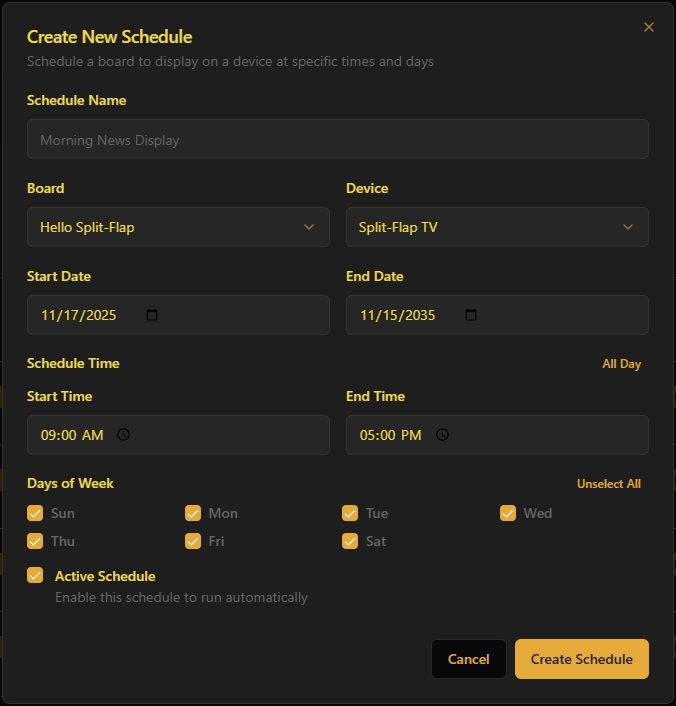
Schedule it.
Then forget about it.
Assign your board to a schedule — choose which screen it plays on, what time it starts, and how long each message shows. Your breakfast menu can appear at 7am and switch to dinner specials at 5pm, automatically, every day, without you touching anything.
Once it’s set, the display runs itself. Update a message from your phone whenever you need to. That’s the whole system.
Tip: Set your most important message first — it shows while the others are loading. A welcome message or today’s special works well.
That’s it.
Now listen for the click.
Your display is live. Every time a message changes, your customers hear that distinctive click‑clack and look up. That’s your moment — your special, your offer, your welcome. Set once, running forever, manageable from your phone anywhere in the world.
Average setup time: under 10 minutes
Common questions
A few things people ask before they start
Do I need to buy any hardware?
Does it work without internet?
Can I run multiple screens?
How long does setup really take?
Can I update messages from my phone?
What if I get stuck?
Ready to start?
Your first board is
10 minutes away.
Try every feature free for 7 days. No credit card required. If it doesn’t work for your business, we’ll refund you within 14 days — no questions asked.